The Summer Thatchers by Steve Crisp – Wentworth – 40 pieces
The Summer Thatchers is an unbelievably beautiful image that was perfect for a 40 piece micro puzzle. There was no enhancing of the photo needed, it’s truly that bright and gorgeous. I’m certain it would be quite difficult as a larger piece count, but my goodness it would be lovely!
If it’s been a while since assembling a wooden puzzle I seem to forget how much I enjoy the tactile experience; the thickness of the pieces, the feel of the image adhered to the wood, the way the pieces fall into place. There’s nothing like it!
Pretty whimsies, especially the flowers, and the surrounding pieces make for an easier assembly – they’re oddly shaped and easy to find. You couldn’t make whimsies like this out of cardboard, the edges would bend and break way too easily.
Wentworth’s micro puzzles are a joy to assemble, and they allow me to work many images that I wouldn’t otherwise in a larger piece count. Starry Night definitely wouldn’t have been assembled other than in this format, that’s for sure. There are still quite a few I have here to assemble, including several winter/Christmas themed images – look for them when the holiday season is upon us, it’ll be here sooner than you think!
I’ve had an odd relationship with this puzzle, it’s been in my home for well over 2 years I think and I’ve started to assemble it several times and ended up putting it away. I’m not sure why this time was a go, but I’m glad I finally got to it – it was very entertaining!
The worst part for me is the very beginning when you see all the pieces you have to sort through. Since my method is to lay the pieces out on trays, I try to decide on several areas to pull pieces for while I’m sorting and traying. I pull the pieces for quite a few different sections for a couple of reasons; 1) to reduce the number of pieces I have to lay out, and 2) to be able to start assembling something right away. Once I have the edge assembled it makes me happy to be able to grab a container of sorted pieces and start to work.
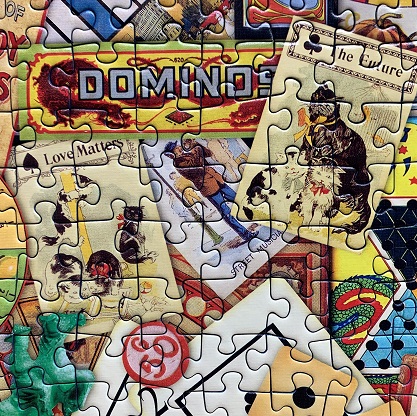
In the case of this puzzle the sections I pulled out were the 4 game boards in the corners, the pieces with words on them, the chinese checkerboard, and the dominoes. The game boards were the MOST fun to put together, the colors are bright and the patterns are interesting. There were many words strewn all around the inside of the puzzle image, and many were hard to complete because they weren’t always easy to find.
I was intrigued by the playing cards with the cats. They all had different phrases on them; The Future, The Past, Love Matters, The Present – what game was this? Does anyone have a clue? Almost all of the vintage games were slightly self explanatory, board games, cards, word games, bingo, etc. The cards with the cats confused me though, were they some kind of kitty cat tarot cards? 🤨
Scrabble tiles, they make me smile. I love playing Scrabble, though no one will play with me around here. I’m pretty good at it and it gets frustrating, apparently, for my family to constantly lose to me. I understand the feeling though, I won’t play strategy games with my husband because he consistently kicks my a** at them. We each have our strengths I suppose. 😉
I’m glad I finally took the plunge and assembled this puzzle. It was fun, the right amount of challenging, and had beautiful colors. I enjoyed it very much, and it is definitely recommended. The quality was excellent, although the fit was a little looser than normal for a Ravensburger; though the image was so compelling and fun that I didn’t mind too much about the fit.
I’ve only had about an hour and a half of sleep, but I’m still working on a puzzle this morning; started sorting this 300 piece puzzle of mini succulents. Here’s hoping it helps to keep me awake long enough today so that I’ll be exhausted at bedtime and ready to get some rest. 😴
I had a quite a weekend of puzzling – I finished a LOT of puzzles. There were 2 kids puzzles, a micro puzzle from Wentworth, a 1000 piece, 550 piece, 400 piece family puzzle, and a 750 piece panoramic! That certainly helped in building my queue back up.
I’m not usually so productive, it was a unique weekend to be sure. 😮
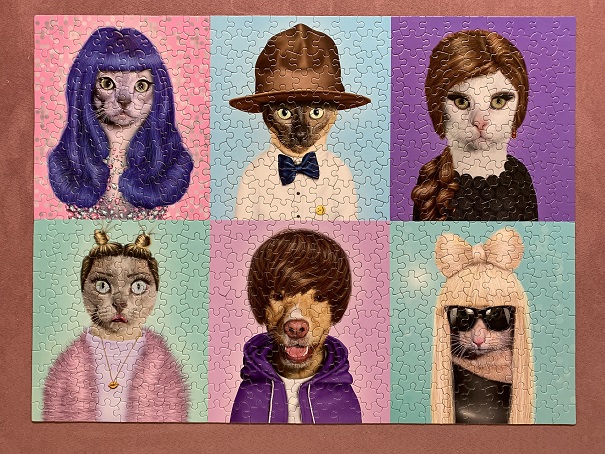
Pets Rock is actually the second puzzle in this series of three that I’ve done, and they all have the same name. They’re highly entertaining (at least they are for me), and go together quite quickly. I very much enjoyed this assembly, and it was the perfect puzzle to help get my puzzle mojo back after more than a week of no puzzling.
Ceaco isn’t a favorite brand; I find that sometimes the quality is quite lacking and sometimes it’s very good – there’s no consistency. The pieces of this puzzle were on the thin side, and had a tendency to bend. They fit together well though, there were a variety of shapes, and the image reproduction was very good. There was a lot of puzzle dust, so much so that I had to vacuum the puzzle board when I was done. A bit annoying, but for the most part didn’t detract from the assembly. Ceaco has a large and interesting catalog of images though, and some are too cute or gorgeous for me to pass up.
I didn’t enjoy the image as much as the first Pets Rock that I assembled; most likely because I’m now a little old lady, and I prefer the personalities that I know and relate to. Elvis, David Bowie, and Michael Jackson are more my style than Miley Cyrus, Justin Bieber, and Katy Perry. Personalities aside, having six sections that are easily sorted and assembled is easy and entertaining. I started with kitty Katy Perry – that blue hair stood out and was fun to put together.
Even though the pieces weren’t the thickest and tended to bend a little, the assembly was quick, fun, and extremely entertaining. If the image is to your liking, it’s definitely recommended. I don’t think a puzzle has to be premium quality in order for you to enjoy it – and I absolutely had a great time putting this one together. 🙂
Have you ever finished a puzzle and thought “It’s gorgeous, I would love to keep this and hang it on the wall as art”? I have, many times. I’ve even bought puzzles specifically for the purpose of gluing and framing them to give as gifts or for myself. The first time I glued a puzzle I sorta jumped in with both feet and figured it out on my own, but if you’re wanting to try it yourself here is a step by step method from my good friend Penny. She’s a puzzle fanatic who is a fellow member of the PADS Posse 😉, and generously agreed to write up a guest post for me while I work on building my queue back up. This is the method that I use as well, and it’s truly as easy as a 4-piece puzzle. Take it away Penny!
Hi everyone! Today I wanted to provide some guidelines for puzzlers who are wanting to glue their puzzles for preservation or display, but who may be a little afraid to try and risk messing up the puzzle, or who have tried unsuccessfully in the past and need more guidance. In another guest post, we will discuss two other preservation methods in more detail – puzzle saver sheets and contact paper.
The most important aspect of choosing this method of preservation is the glue itself. Don’t cheap out and buy your local store’s brand of glue – it could cost you the entire puzzle. Elmer’s glue doesn’t always work well either and can warp the puzzle over time or have a sticky feel even after drying. Also, most of the “puzzle” glue brands out there will also produce inconsistent quality and thereby, results. The best glue I have found to preserve a puzzle is Mod Podge. Mod Podge is a crafter’s multi-purpose type of glue that works well on many different mediums and is completely safe on cardboard puzzles. It can be easily found at most crafting and Walmart stores in the United States. It may also be readily available in some other countries, but I do not have enough experience in that area to say for sure. Modge Podge comes in two distinctly different finishes – glossy and matte. Think of photographs you have printed in the past – some are smooth and shiny (glossy) while others may have been more dull and textured (matte). Both finishes work well so it really is a matter of personal preference. The glossy one will likely provide a bit more glare on a puzzle when finished and displayed, but that may be exactly the look you want. 😊
Once you have decided which finish to use, you will want to protect whatever board / table you will be using to glue the puzzle. I have a piece of plywood that I use for smaller (2000 and under) puzzle assembly, but then also use it to glue the puzzles on afterward. The first thing to do is measure out two or more long pieces of waxed paper. You want it to be at least a couple of inches longer than the width and height of your puzzle as some glue is likely to “spill” off the puzzle onto the waxed paper during the process. Cut enough pieces of waxed paper to allow for a two-inch overlap on ALL sides. Next, you will want to very gently lift just a tiny bit of the bottom edge of the puzzle so you can slide the first piece of waxed paper until the edge of the puzzle. Then, you gently shimmy and slide the waxed paper up to the top of your puzzle – again, making sure to allow for a two-inch border of paper above the top border of the puzzle. Repeat this process until you have laid down enough paper (overlapping under the puzzle as well) to cover the entire puzzle top to bottom with the two-inch border.
The materials you’ll need…
Next, grab an old credit card or frequent shopper type of plastic card you don’t need any longer. This is the best tool for ensuring the puzzle glue gets evenly distributed over the entire puzzle. Open your bottle of Modge Podge and pour about a quarter to half dollar size drop of glue onto the top of the puzzle on the left half, toward the middle. From here, you are going to use the long edge of the credit card to spread the glue evenly up to the top and to the left side of the puzzle. Then down to the bottom.
Spreading the glue…
The glue, when wet and applied, will be white. It will always dry clear though. Essentially, you want to use the card to stroke and move the glue around ensuring you are evenly distributing it over the pieces and in between each of the pieces. It should look like you are grouting a tile floor. You always want to make sure you don’t leave any long strips of glue or pooled up glue in any area.
Don’t leave big streaks like this…
Go over the puzzle multiple times ensure all the glue gets evenly distributed over the left side of the puzzle. It does not have to be a super thick coat of glue on top, but the essential factor is that you get the glue evenly distributed between the pieces. If you have done it correctly, you should be able to see a white outline around each individual puzzle piece. If you have some pieces that still look like the colored cardboard backing, then glue has not been grouted into this area.
See how the pieces on the right aren’t “grouted”…
Go back over it, or apply a very small amount more of the glue to those specific areas making sure to spread it out evenly and completely. Once you have done this with the left side of the puzzle, repeat the same process for the right side.
A couple of tips – if the glue spills over the top, bottom, or side of the puzzle slightly as you’re spreading it around, don’t panic. It’s okay for it to do this. The easiest way to fix it is to dampen a paper towel with water, and very carefully use your fingertip with the wet paper towel over it, along the edge of the puzzle where it has glue overage. Try to only touch the excess glue that’s coming off the sides. As long as the glue is still wet, it will wipe right off onto the wet paper towel and you can throw it away.
Clean off any excess…
Now, for the hardest part of this process – WALK AWAY AND LEAVE IT ALONE FOR AT LEAST 45 MINUTES TO 1 HOUR!!! 😊 It will likely dry in about 20 – 30 minutes if you don’t go crazy with the amount of glue you used, but best practice would be to leave it alone for 45 minutes to 1 hour to ensure it is completely dried. After this time, very gently touch one fingertip to a small area of the top of the puzzle. If it feels the least bit sticky or “tacky”, it is not completely dried yet and you will need to WALK AWAY again and try back in another 15 to 20 minutes. If it’s not the least bit sticky or tacky, try putting a finger on one or two other areas of the puzzle and test it as well. If you are able to do this without it feeling sticky, then the glue is dried. At this point, you can gently lift the puzzle up on one side to remove it from the waxed paper. There may be a couple of places where the wax paper tries to stick to the puzzle just a bit, but it should come off without too much effort if you wiped up any glue spillage with the wet paper towel as discussed earlier.
At this point, you can decide whether or not you think you want to glue the other side of the puzzle in addition to the front. Now, I know you’re probably thinking – why not glue the back side of the puzzle first so that I don’t HAVE to put glue on the front? This IS an option certainly, but in my experience it is much easier to glue the front of the puzzle first rather than trying to pick up and flip over a completed puzzle that may be on the loose side. If you can sandwich the puzzle between the assembly board and your glueing board, then by all means, feel free to flip it. I just find it is much more difficult to do it that way for fear of the entire puzzle sliding off or getting destroyed in the flipping process. Once the front is glued, it will be firm enough to easily flip over to the back without the need for sandwiching between two boards.
Finished and dried!
And voila! Your efforts are now rewarded with a beautiful puzzle that is ready for framing and displaying. 😊